

1–2, 3–6, 6–12 Weeks: Ligament Sprain Recovery Milestones
Grade I sprains usually settle in 1 to 2 weeks, Grade II in 3 to 6 weeks, and Grade III in 6 to 12 weeks or longer. Timelines matter less than what you do inside them: early, guided rehab that progresses by function rather than the calendar predicts recovery better than any fixed schedule. The first move after any sprain is protection and controlled movement, not weeks on the couch, followed by a rehab plan that meets objective milestones before you push harder.
TL;DR:
- Recovery timelines vary by sprain grade, with Grade I taking 1 to 2 weeks, and Grade III often lasting 6 to 12 weeks or more, depending on individual factors.
- Early, guided rehabilitation focusing on function and objective milestones outperforms fixed schedules, especially after the initial acute phase.
- Icing, protection, compression, elevation, and gentle movement in the first 72 hours are crucial to avoid delaying healing and setting up a smooth recovery.
- Progression through rehab phases involves restoring motion, strengthening stabilizer muscles, and then advancing to sport-specific drills, with objective testing to determine readiness.
- Reinjury risk remains high if strength, balance, and confidence are not fully restored before returning to full activity, making criterion-based assessments essential.
Table of Contents
- Ligament Sprain Recovery Timelines by Grade
- What to Do in the First 48 to 72 Hours
- Rehab Phases: Moving From Motion to Sport
- When to See a Provider, and When Imaging Matters
- Treatment Options: From Bracing to Surgery
- Preventing Reinjury and Knowing When You’re Ready
- Where Hands-On Care Fits Into the Rehab Roadmap
- A Straight Answer on What Actually Speeds Recovery
- How Thetxroom Supports Your Recovery
- Sources
- FAQ
Ligament Sprain Recovery Timelines by Grade
The grading system tells you how much ligament fiber tore, and it’s the single best predictor of how long you’ll be sidelined. Grade I means stretched or micro-torn fibers with the joint still stable. Grade II means partial tearing with some looseness. Grade III means a complete tear, often with visible instability.
Clinical guidance groups the three grades into distinct healing windows:
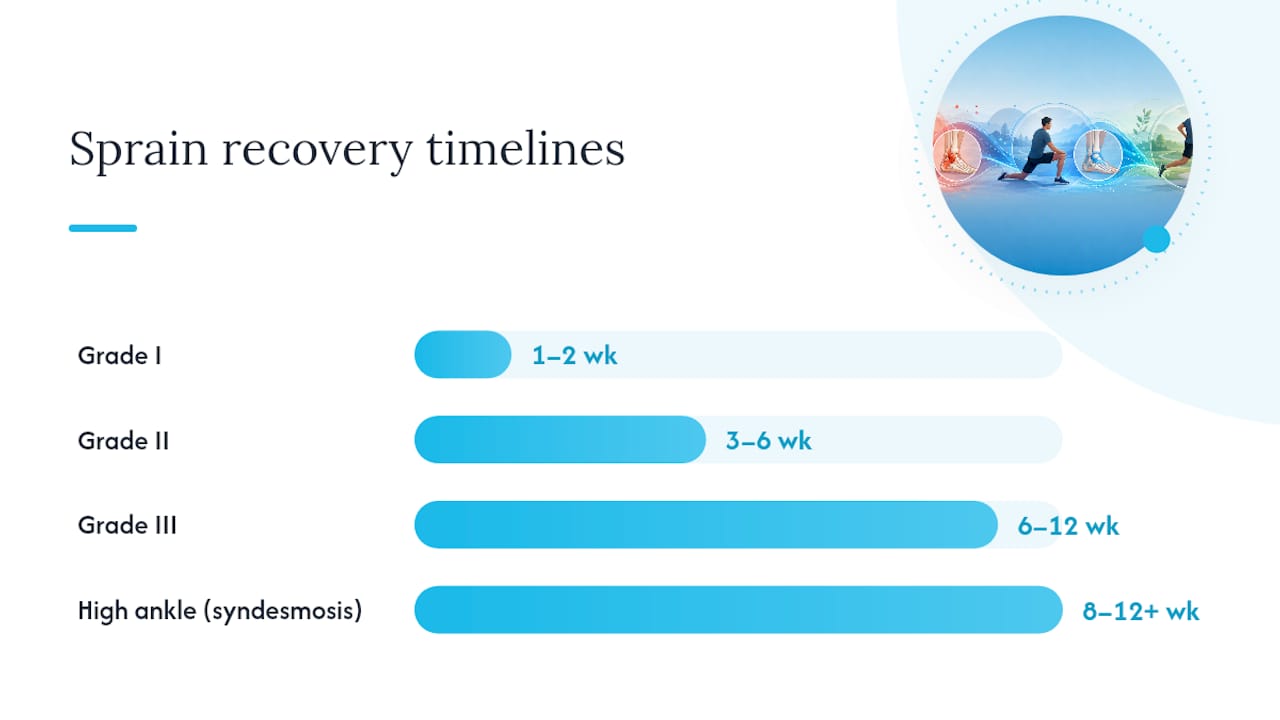
- Grade I: 1 to 2 weeks. Goal: walk without a limp and regain close to full range of motion.
- Grade II: 3 to 6 weeks. Goal: pain kept to a minimum while bearing weight, with strength and basic balance improving week over week.
- Grade III: 6 to 12 weeks, sometimes longer. Goal: progressive strengthening, with a surgical referral considered if instability doesn’t resolve with conservative care.
- High ankle (syndesmosis) sprains: Often 8 to 12 weeks or more. These involve the ligaments connecting the two lower leg bones above the ankle, and they behave differently from the more common lateral ankle sprain.
That last category trips up a lot of people. A syndesmosis sprain can look mild on the outside while taking twice as long to heal as a “worse looking” lateral sprain, because the mechanics of that joint demand more protection before you load it. If your ankle was rolled inward with the foot forced outward, rather than the classic roll to the outside, ask specifically whether a high ankle sprain is on the table.
One more wrinkle worth knowing: grade isn’t destiny. Two people with the same Grade II sprain can land on opposite ends of that 3 to 6 week window depending on age, prior injuries to the same joint, and how quickly they start moving under supervision.
What to Do in the First 48 to 72 Hours
The acute phase is where most people either set themselves up for a smooth recovery or accidentally slow it down. The standard framework has evolved from simple RICE to POLICE: Protection, Optimal Loading, Ice, Compression, Elevation. The shift matters. “Rest” alone tends to stiffen a joint and delay healing, while optimal loading (some gentle, pain-free movement) keeps blood flow and tissue quality on track.
Here’s a practical sequence for the first three days:
- Protect the joint with a brace, taping, or a boot if weight-bearing causes sharp pain. Crutches are reasonable for the first day or two if you can’t put weight down without pain, but drop them as soon as you can walk without a significant limp.
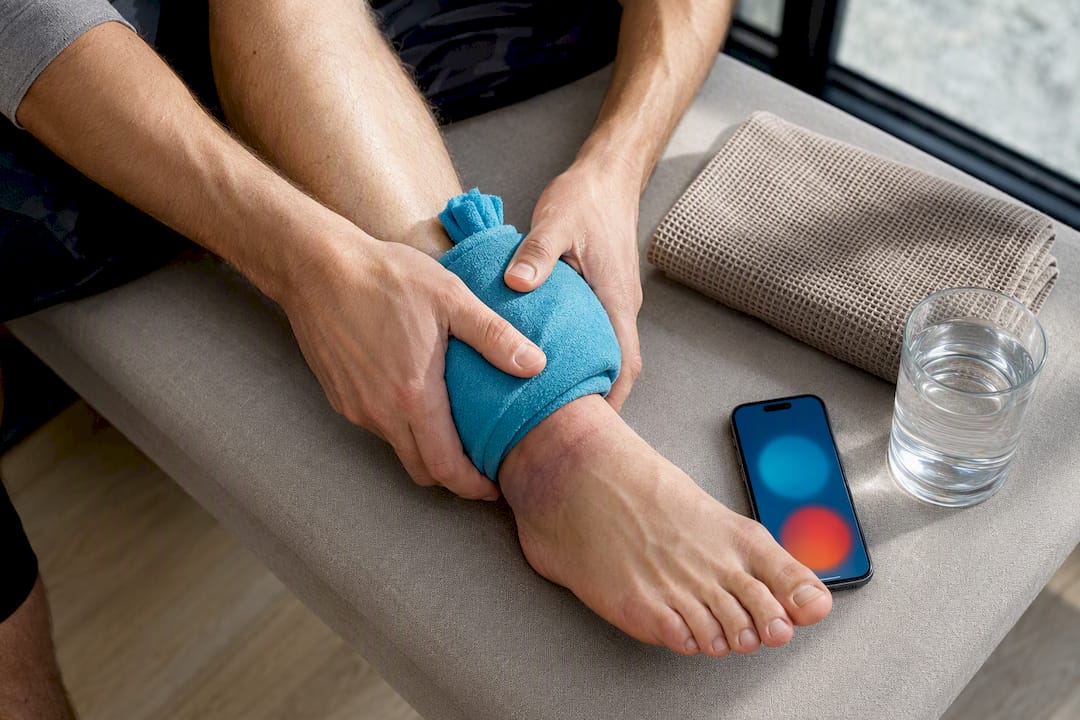
- Apply ice for 15 to 20 minutes every 2 to 3 hours while awake. Cryotherapy in the acute stage reduces swelling and tends to improve how the joint feels in the short term.
- Compress with an elastic wrap, snug but not so tight that toes tingle or go numb.
- Elevate the limb above heart level whenever you’re sitting or lying down, especially at night.
- Move gently within pain-free range starting the first or second day. Total immobilization for more than a couple of days tends to work against you.
Over-the-counter acetaminophen or short-term NSAIDs can manage pain reasonably well, though some clinicians caution against relying on NSAIDs for more than a few days, since there’s ongoing debate about whether they blunt early tissue healing. Skip heat, hot tubs, alcohol, and aggressive massage in the first 72 hours. All three tend to increase swelling right when you’re trying to control it.
Pro Tip: Set a phone timer for icing sessions during the first two days. People consistently underdose ice because they get busy, and consistent cold exposure in the acute window makes a noticeable difference in next-day swelling.
Rehab Phases: Moving From Motion to Sport
The NHS confirms early range-of-motion work speeds recovery compared to prolonged rest, which is why rehab starts almost immediately, just in a controlled way. There’s growing consensus that rehab should be criterion-based rather than tied to a fixed number of weeks. You move to the next phase when your joint hits specific benchmarks, not when a calendar says so.
Phase 1: Early motion (days 1 to 10, roughly)
- Ankle alphabet drills: trace each letter of the alphabet with your toes to restore range of motion.
- Gentle dorsiflexion and plantarflexion stretches within a pain-free zone.
- Protected weight-bearing as tolerated, progressing off crutches as pain allows.
Phase 2: Subacute strengthening (weeks 2 to 6, depending on grade)
- Resistance band work for the peroneals, calf, and tibialis muscles that stabilize the joint.
- Balance progressions, starting with double-leg stance on a firm surface and moving toward single-leg holds.
- Light neuromuscular training that challenges the joint’s ability to react, not just its raw strength.
Phase 3: Advanced and sport-specific (from roughly week 4 onward for milder sprains, later for Grade III)
- Plyometric drills like box jumps and lateral hops, added only once pain-free range and reasonable strength are back.
- Cutting and pivoting drills that mimic your sport’s actual demands.
- Objective return-to-play testing, including strength symmetry between limbs and hop-test performance compared to the uninjured side.
A physical therapist earns their keep here by measuring, not guessing. For structural exercises that support this progression, foot strengthening routines built around balance and load can fill the gap between clinic visits.
When to See a Provider, and When Imaging Matters
Most sprains don’t need an X-ray or a specialist. Some clearly do. Get evaluated promptly if you notice any of the following:
- Inability to bear weight for four steps immediately after injury or in the days following.
- Visible deformity or a joint that looks obviously out of alignment.
- Numbness or tingling in the foot or toes, which can signal nerve or circulation involvement.
- Swelling that keeps worsening past 72 hours instead of leveling off.
- Bruising that spreads far beyond the joint, which sometimes points to a more significant tear.
Emergency departments and clinics commonly use the Ottawa ankle rules to decide who actually needs an X-ray, screening for point tenderness over specific bones plus an inability to walk. It cuts unnecessary imaging substantially while still catching fractures. If X-rays are clear but instability or pain persists past a couple of weeks, an MRI or ultrasound can look at the ligament and surrounding soft tissue directly. After evaluation, expect one of three paths: a short period of protective immobilization, a referral to physical therapy, or, less commonly, an orthopedic referral for suspected complete tears or high ankle involvement.
Treatment Options: From Bracing to Surgery
Treatment scales with severity, and Mayo Clinic’s guidance reflects what most orthopedic and sports medicine practices recommend.
- Functional bracing or taping, typically for 4 to 6 weeks, tends to outperform prolonged casting for most sprains. Clinical guidance favors early functional treatment over extended immobilization because it lets the joint keep moving while still getting support.
- Physical therapy is the backbone of recovery for nearly every grade, focused on restoring motion, strength, and balance.
- Adjunctive modalities like ultrasound therapy or platelet-rich plasma injections show mixed evidence. Some patients report benefit, but the research doesn’t yet support them as a reliable standalone fix, so treat them as optional add-ons rather than substitutes for rehab.
- Surgery is reserved for chronic instability or cases where 3 to 6 months of thorough conservative treatment hasn’t resolved the problem. The goal is usually reconstructing or tightening the damaged ligament to restore joint stability.
Preventing Reinjury and Knowing When You’re Ready
Reinjury risk is real, and it’s highest in the weeks right after you feel “mostly better.” Returning to strenuous activity before strength and balance are fully restored significantly raises the odds of reinjury and long-term instability, which is exactly why criterion-based testing matters more than how the joint feels on a given day.
- Build proprioception deliberately. Balance board work and single-leg stance progressions, done consistently for several weeks, retrain the joint’s sense of position.
- Keep bracing or taping in play during sport for a stretch after you return, tapering off only once confidence and stability hold up under real conditions.
- Address footwear and conditioning. Worn-out shoes and weak hips or calves both raise recurrence risk.
- Pass an objective checklist before full return: pain-free functional movement, strength within roughly 80 to 90% of the uninjured side, and clean performance on sport-specific drills like cutting or jumping.
Where Hands-On Care Fits Into the Rehab Roadmap
Manual therapy complements a phased rehab plan rather than replacing it. Hands-on treatment using the Fascial Distortion Model can address soft tissue restrictions that can slow the strength and mobility gains a home program alone sometimes misses.
A typical patient flow looks like this: assessment of the injury and movement pattern, a tailored plan combining manual therapy with home exercises, then reassessment against the same objective criteria used in standard rehab, strength symmetry, balance, and pain-free range of motion.
Readers stuck at a plateau, or those who want a plan built specifically around their injury, tend to benefit most from this kind of hands-on input alongside standard PT. For a broader look at how manual therapy fits into recovery from tendon and connective tissue injuries, this overview of post-surgery and soft tissue rehab approaches covers similar principles from a different angle.
A Straight Answer on What Actually Speeds Recovery
Most sprains heal well when you respect the phases and let function, not frustration, dictate the pace. The biggest mistake isn’t being too cautious. It’s skipping the boring balance work because the ankle “feels fine” prematurely. If pain or instability lingers beyond the expected recovery period for your grade, that’s not a sign to push harder. It’s a sign to get reevaluated.
— Chris
How Thetxroom Supports Your Recovery
A generic home exercise sheet can’t feel where your ankle is actually restricted, and a walk-in urgent care visit can’t build you a phased rehab plan. Hands-on treatment built around the Fascial Distortion Model, paired with individualized rehab that tracks progress against the same strength and balance benchmarks covered above, can help bridge the gap between home exercise programs and urgent care visits.
If you’re a few weeks into a sprain and the swelling or instability hasn’t fully resolved, or you just want a plan instead of guesswork, the sprains and strains care page outlines what an initial visit looks like. Call or book an assessment to receive a specific plan tied to your injury.
This article is general information, not a substitute for advice from a qualified doctor. Consult a qualified healthcare professional about your own circumstances before acting on anything here.
Sources
- Chapter: Sprains (National Library of Medicine / Clinical guideline content)
- Article on individualized rehab and criterion-based progression (PMC)
- Harvard Health: Recovering from an ankle sprain
- AAFP patient information: Recovering from an ankle sprain
- Mayo Clinic: Sprained ankle — diagnosis and treatment
FAQ
How Long Does a Ligament Sprain Last?
Most Grade I sprains resolve in 1 to 2 weeks, Grade II in 3 to 6 weeks, and Grade III in 6 to 12 weeks or longer, depending on how well rehab progresses.
My Sprained Ankle Isn’t Getting Better. What Should I Do?
If pain, swelling, or instability persists beyond the expected window for your grade, get reevaluated. Hidden issues like a high ankle sprain, an incomplete rehab plan, or returning to activity too soon are common culprits.
Should You Ice a Sprained Ankle?
Yes. Icing for 15 to 20 minutes every 2 to 3 hours during the first 48 to 72 hours reduces swelling and supports better short-term outcomes.
How Long Does It Take to Recover From a Torn Ligament in the Ankle Without Surgery?
A complete (Grade III) tear managed conservatively typically takes 6 to 12 weeks, though surgery may be considered if instability persists after 3 to 6 months of dedicated rehab.