
8-Week Lower Cross Syndrome Rehab: 24 Sessions Backed by RCTs
Corrective exercise that pairs stretching of tight hip flexors and lumbar extensors with progressive strengthening of the glutes and deep core muscles is the most reliable lower cross syndrome treatment available. Most people doing this consistently three times a week notice measurable changes within a couple of months. If symptoms persist past that point, or you cannot activate the right muscles on your own, hands-on care from a clinician becomes the next sensible step.
TL;DR:
- Hold kneeling hip flexor stretches for 30 to 60 seconds per side once or twice daily, while pairing them with glute and deep core exercises.
- Programs lasting eight weeks use 24 sessions; NASM and core stability both improved posture, while NASM also improved lateral trunk endurance in some measures.
- A four week program using pressure biofeedback to activate the transverse abdominis reduced disability more than conventional care and may offer an earlier starting point.
- Get a clinical reassessment if symptoms persist after eight weeks or you cannot activate target muscles; seek urgent care for new neurological or bladder symptoms.
Table of Contents
- What to Stretch, What to Strengthen, and When Manual Therapy Helps
- What the Research Says About Corrective Exercise Protocols
- A Practical 8-Week Program You Can Follow or Bring to a Clinician
- Tracking Progress and Knowing When to Push Further
- When Hands-On Clinical Care Makes Sense
- Our Take: Exercise Alone Often Isn’t Enough
- How We Approach Lower Cross Syndrome at The Tx Room
- FAQ
- Sources
What to Stretch, What to Strengthen, and When Manual Therapy Helps
Lower cross syndrome follows a predictable pattern. The hip flexors and lumbar extensors tighten from too much sitting or repetitive loading, while the glutes and deep abdominal muscles weaken in response. The result is an exaggerated curve in the lower back, a forward-tilted pelvis, and often nagging low back or hip discomfort.
Fixing the pattern means working both ends of it at once. Stretching alone loosens tight tissue without teaching the weak muscles to do their job, and strengthening alone fights against tissue that will not lengthen.
- Stretch the iliopsoas and rectus femoris with a kneeling hip-flexor stretch, held 30 to 60 seconds per side, once or twice daily.
- Release the lumbar extensors with gentle extension-based stretches like a seated forward fold or child’s pose variation.
- Activate the gluteus maximus with bridges and step-ups, progressing to banded hip thrusts as control improves.
- Build the transverse abdominis and lateral trunk stabilizers with dead bugs, bird dogs, and side planks.
Manual therapy speeds this along in many cases. Soft tissue work and fascial techniques such as the Fascial Distortion Model reduce guarding in the tight muscle groups, which makes the lengthening phase more effective and lets the activation exercises recruit the right muscles sooner instead of being blocked by residual tension. For readers working on the hip flexor piece at home, a handful of simple hip-opening movements can be a useful starting point before progressing to loaded activation work.
What the Research Says About Corrective Exercise Protocols
The clinical evidence behind this approach is more specific than most people expect. Trials structured around eight-week corrective exercise programs, typically delivered as 24 total sessions at three per week, consistently show reductions in lumbar lordosis and pelvic tilt alongside improved gluteal muscle activation.
A randomized trial comparing NASM and core stability protocols in athletes found both approaches reduced lordosis and pelvic tilt over eight weeks, with NASM showing an added advantage in lateral trunk flexor endurance in some measures. A separate trial using the NASM framework in women with lower cross syndrome reported increased gluteus maximus EMG activity alongside reduced lordosis after the same 24-session dose.
Shorter interventions have a place too. A four-week transverse abdominis preactivation program using pressure biofeedback guidance produced greater reductions in disability and higher TrA activation than conventional care, useful for people who need an early win before committing to the full eight-week arc.
- NASM protocol: inhibition, lengthening, activation, integration, in that order each session.
- Core stability exercise (CSE) programs: similar structure, lighter emphasis on the inhibition phase.
- Assessment tools used across these trials: a flexicurve ruler for lordosis, a pelvic inclinometer for pelvic tilt, EMG for muscle activation, and a pressure biofeedback unit (PBU) for transverse abdominis engagement.
Neither protocol beats the other decisively. The practical takeaway is that structured, phased programming matters more than which specific template you follow.
A Practical 8-Week Program You Can Follow or Bring to a Clinician
Every session in the research follows roughly the same shape: inhibit tight tissue, lengthen it, activate the weak muscles, then integrate the new pattern into movement. Here is how that translates into a week-by-week plan.
- Weeks 1 to 2: Foam-roll the hip flexors and lumbar paraspinals for two minutes each, then hold kneeling hip-flexor stretches for 30 to 60 seconds per side. Follow with low-load glute bridges and dead bugs, two sets of 10, focusing on form rather than fatigue.
- Weeks 3 to 4: Add banded hip-thrust progressions and side planks, three sets of 10 to 12 reps, while keeping the stretching routine unchanged.
- Weeks 5 to 6: Increase resistance on hip thrusts and bridges, introduce Pallof press variations for rotational core control, and begin basic functional integration like split squats or step-downs.
- Weeks 7 to 8: Combine activation and integration work into compound movements, such as loaded step-ups with a controlled tempo, while tracking whether pain during daily activity has dropped.
Throughout the program, keep the spine in a neutral position during every exercise rather than letting the lower back arch or flatten under load. Quality of movement matters more than how much weight or resistance you add, especially in the first four weeks when the nervous system is still relearning the pattern. Readers building squat-based integration work into later weeks may also find it useful to check hip control during squatting before adding load.
Pro Tip: Film your bridge or step-up from the side once a week. If your pelvis tips forward or your lower back arches under load, drop the resistance before adding more reps.
Tracking Progress and Knowing When to Push Further
Progress in a corrective exercise program shows up in a few trackable ways: lower pain scores during daily tasks, longer hold times on a plank or McGill endurance test, and a visibly reduced pelvic tilt or lumbar curve when you check your posture in a mirror.
Move to the next phase once you can perform the current exercises with correct form and without pain, not simply once a set number of weeks has passed.
- Track weekly: pain during walking or sitting, plank hold time, and ease of maintaining neutral spine under load.
- Progress when: form is consistent, pain trends downward, and endurance improves session to session.
- Watch for red flags: new bowel or bladder changes, progressive leg weakness or numbness, or worsening pain at night. These warrant urgent medical attention, not more stretching.
- Get reassessed by a clinician every four to eight weeks, especially if biofeedback tools like a pressure biofeedback unit are available to confirm transverse abdominis engagement.
When Hands-On Clinical Care Makes Sense
Home programs work for many people, but some signs call for a clinician’s hands rather than another month of solo effort.
- Symptoms persist despite eight consistent weeks of stretching and activation work.
- You notice numbness, tingling, or weakness that was not there before.
- You cannot feel the target muscles engaging, no matter how you adjust the exercise.
A clinic visit typically includes a postural and movement assessment, manual soft-tissue or fascial work, dry needling where appropriate, biofeedback-guided activation training, and a reassessment plan to keep the program moving forward instead of stalling.
Our Take: Exercise Alone Often Isn’t Enough
Most guidance on lower cross syndrome treats it as a pure exercise problem: stretch this, strengthen that, repeat for eight weeks. That advice is not wrong, but it skips the part that trips up a lot of people. Chronically tight hip flexors and lumbar extensors do not always respond to stretching alone because the tissue itself can be restricted in ways that a static hold does not reach.
We think the more honest framing is that corrective exercise and hands-on fascial work solve different parts of the same problem. Exercise retrains the nervous system to use the right muscles. Manual work addresses tissue that is too restricted for that retraining to take hold quickly. Programs that only do one often plateau, then get written off as ineffective when the real issue was sequencing.
— Chris
How We Approach Lower Cross Syndrome at The Tx Room
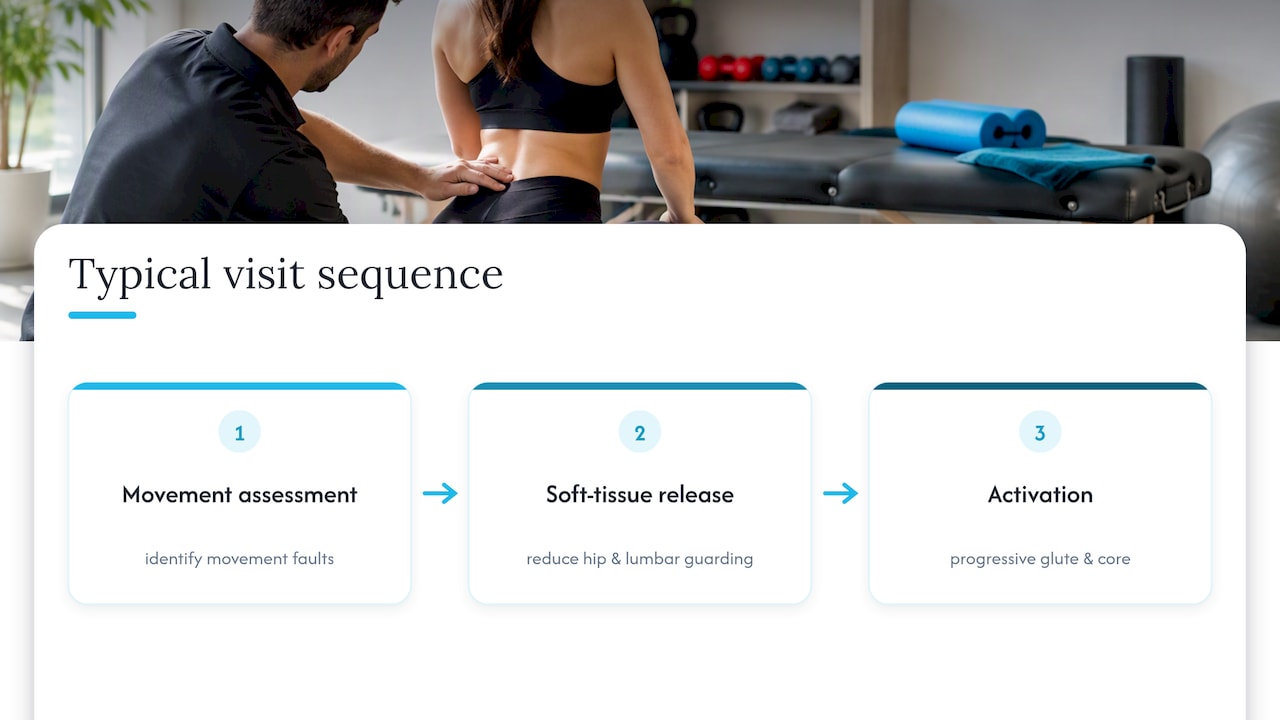
We treat lower cross syndrome by combining hands-on fascial work with the same corrective exercise sequencing seen in clinical research. A typical visit starts with a movement assessment, followed by targeted soft-tissue or Fascial Distortion Model work to reduce guarding in tight hip flexors and lumbar tissue, then a progressive activation plan for the glutes and core.
Using Soft Tissue Therapy alongside guided activation often lets patients tolerate strengthening exercises sooner than exercise alone allows. If you have been stuck in a stretch-and-strengthen routine without progress, book a visit to find out what is holding your recovery back.
This article is general information, not a substitute for advice from a qualified doctor. Consult a qualified healthcare professional about your own circumstances before acting on anything here.
FAQ
Can you fix lower crossed syndrome?
Yes, in most cases. Consistent corrective exercise programs that combine stretching tight muscles with strengthening weak ones over eight weeks produce measurable improvements in posture and pain for many people.
What are some good exercises for upper and lower cross syndrome?
For lower cross syndrome, kneeling hip-flexor stretches, glute bridges, banded hip thrusts, and dead bugs form the core of most programs. These target the tight hip flexors and lumbar extensors while building strength in the glutes and deep core muscles.
What are the causes of lower cross syndrome?
Lower cross syndrome develops from prolonged sitting, repetitive forward-leaning postures, or activities that overuse the hip flexors while underusing the glutes and core. Over time this imbalance pulls the pelvis into an anterior tilt and increases the curve in the lower back.
How long does it take to fix lower cross syndrome?
Clinical trials commonly use eight-week corrective exercise programs, typically delivered as 24 total sessions, to produce measurable reductions in lumbar lordosis and pelvic tilt. Some shorter four-week programs focused on core activation show earlier improvements in disability, though full correction often takes longer for established postural patterns.
Does chiropractic help lower cross syndrome?
Hands-on care can help when exercise alone has stalled, particularly for releasing tight hip flexor or lumbar tissue that resists stretching. It works best paired with a structured activation and strengthening program rather than as a standalone fix.