

8–12 Week High Ankle Sprain Rehab With Clinic Tested Milestones
Protect the ankle immediately: avoid forced outward twisting or pushing the foot upward, start POLICE or RICE, and limit weight-bearing to what feels safe. Most stable high ankle sprains heal without surgery through a short protective period followed by early controlled movement and a structured rehab plan. See a clinician promptly if you cannot bear weight, the joint looks unstable, or pain and swelling keep worsening.
TL;DR:
- Most high ankle sprains heal without surgery through protected initial care, early controlled movement, and structured rehabilitation.
- Immobilization should be brief, with emphasis on ice, compression, elevation, and avoiding outward twisting or upward pushing of the foot during the first week.
- Imaging such as weight-bearing X-rays is crucial if there is inability to bear weight, swelling spreads quickly, or instability is suspected, to rule out fractures or ligament failure.
- Rehab progresses through phases focused on pain control, restoring motion, rebuilding strength, and then regaining proprioception and agility, with return to sport based on strength symmetry and functional testing.
- In stubborn cases, manual therapy and hands-on treatment options can improve recovery when standard home exercises and bracing stall.
Table of Contents
- What a High Ankle Sprain Actually Involves
- Protecting the Joint in the First Week
- Recognizing Red Flags and Choosing the Right Imaging
- A Practical Week-by-Week Rehab Progression
- Braces, Boots, and Tape: Matching Support to Severity
- When Surgery Enters the Picture
- Getting Back to Sport Without Setting Yourself Up for Round Two
- How The Tx Room Approaches High Ankle Sprain Recovery
- What Most Rehab Advice Gets Wrong
- Getting Hands-On Help for a High Ankle Sprain That Is not Improving
- Sources
- FAQ
What a High Ankle Sprain Actually Involves
A high ankle sprain, also called a syndesmotic sprain, injures the ligaments connecting the two lower leg bones just above the ankle joint rather than the ligaments on the outside of the foot that get hurt in a typical rolled ankle. This connection, called the distal tibiofibular syndesmosis, relies on three structures working together:
- The anterior inferior tibiofibular ligament (AITFL), which resists the shin bones separating at the front
- The posterior inferior tibiofibular ligament (PITFL), which stabilizes the back of the joint
- The interosseous ligament, a tough membrane running between the two bones that shares load across the whole lower leg
These ligaments keep the tibia and fibula locked together so the ankle can rotate and bear weight without the bones spreading apart. A high ankle sprain usually happens when the foot twists outward while the ankle is bent upward, a mechanism common in football, soccer, skiing, and any sport involving cutting or planting the foot. That same force can also fracture the fibula higher up the leg, an injury pattern known as a Maisonneuve fracture, which is why clinicians check the whole leg, not just the ankle, after this type of injury.
Because the syndesmosis has to stabilize the entire lower leg rather than just the foot, these sprains tend to heal slower and demand more caution during early movement than the common lateral ankle sprain most people picture.
Protecting the Joint in the First Week
The first several days set the tone for everything that follows. According to a rehabilitation review on syndesmotic sprains, standard acute management follows RICE or POLICE protocols, often paired with short-term NSAIDs and a functional brace that protects the joint while still allowing some movement. The goal in this window is calming the injury down without locking the ankle away for so long that it stiffens or the muscles around it weaken unnecessarily.
- Protect first. Avoid the two motions that stress a healing syndesmosis most: forcing the foot to rotate outward and pushing the ankle into a deep upward bend. The same review notes these movements widen the joint space between the tibia and fibula and can slow healing.
- Ice smart. Apply ice for periods of roughly 15 to 20 minutes at a time during the first 48 to 72 hours, allowing skin temperature to normalize between sessions.
- Compress and elevate. A snug elastic wrap combined with elevating the foot above heart level when resting helps limit the swelling that otherwise stiffens the joint and slows early motion.
- Limit weight-bearing appropriately. Crutches or a walking boot for a short stretch, often a few days to a couple of weeks depending on severity, protect the ligament while still permitting gentle standing as symptoms allow.
- Manage pain sensibly. Over-the-counter options like ibuprofen or acetaminophen are commonly used short-term; check with a pharmacist or physician about dosing limits and any conditions such as kidney disease or stomach ulcers that make NSAIDs riskier.
A systematic review of conservative ankle sprain treatment found that cryotherapy paired with early exercise improves short-term pain relief more reliably than ice alone, reinforcing the idea that protection and gentle motion belong together rather than in sequence. The same review concluded that functional treatment, meaning early controlled movement, generally outperforms prolonged immobilization for restoring function, though no single conservative method beats all others across every case.
Pro Tip: Set a phone reminder to reapply ice every two to three hours during the first two days. Consistency matters more than any single ice session.
For a fuller walkthrough of what to do in those first 48 to 72 hours, this early rehab guide breaks down the sequence step by step.
Recognizing Red Flags and Choosing the Right Imaging
Not every ankle sprain needs a scan, but certain signs mean you should get evaluated rather than wait it out at home.
- Inability to bear any weight on the injured leg, even briefly
- Swelling that spreads rapidly or bruising that appears within hours rather than days
- A sense that the ankle mortise, the socket where the foot bones sit, feels widened or unstable
- Numbness, tingling, or a cold, discolored foot, which can point to nerve or circulation involvement
- Pain that worsens instead of gradually improving over the first week
Clinicians often start with two bedside tests: the squeeze test, which compresses the tibia and fibula together higher up the leg to see if it reproduces ankle pain, and the external rotation test, which twists the foot outward while the knee is bent. Both are useful screening tools, but neither is definitive on its own, so a positive result usually leads to imaging rather than a final diagnosis.
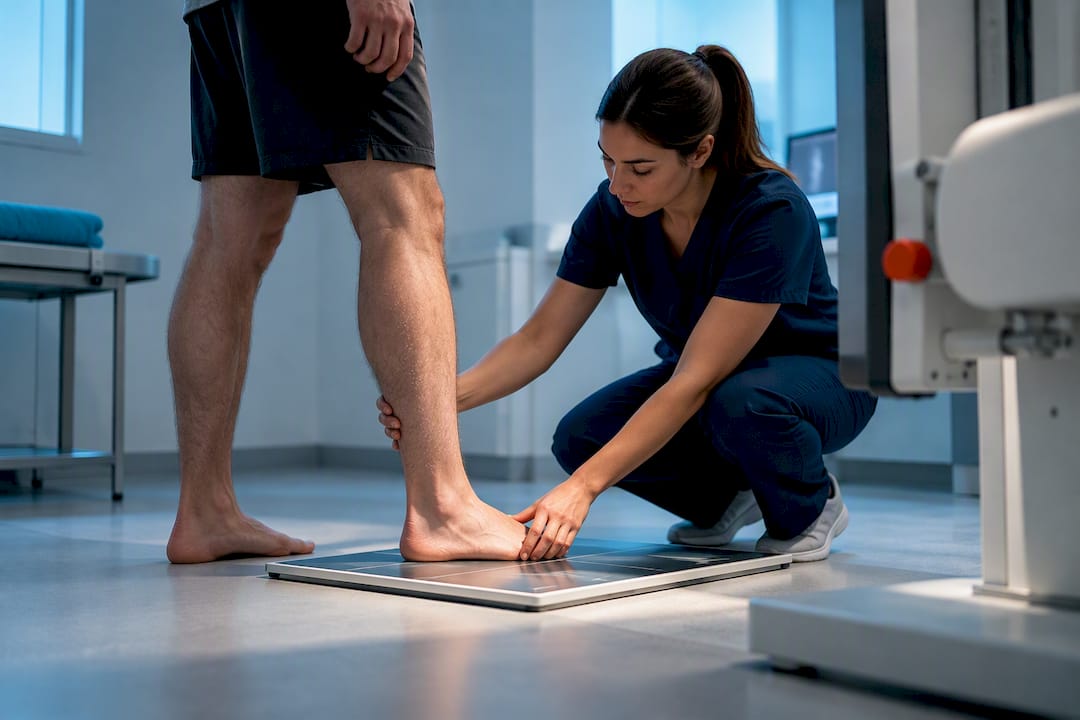
Weight-bearing X-rays are typically the first step, since they can reveal whether the space between the tibia and fibula has widened, a sign of instability that changes the treatment plan. When X-rays look normal but suspicion remains high, or when a clinician needs a detailed look at ligament and cartilage damage, an MRI or referral to an orthopedic specialist follows. Anyone with suspected instability, a possible fracture, or symptoms that fail to improve within the first couple of weeks should have this level of evaluation rather than continuing to guess at home.
A Practical Week-by-Week Rehab Progression
Once the acute phase settles, rehab moves through three overlapping stages. The pace depends on severity and how the ankle responds, but the milestones below reflect the progression most stable, non-surgical high ankle sprains follow.
Phase 1: weeks 0 to 2, calming the joint and restoring motion. The priorities here are pain control and gentle range of motion, not strength. The “ankle alphabet,” tracing letters in the air with the foot while seated, is a simple way to restore motion without stressing the syndesmosis. Weight-bearing progresses as tolerated, often starting with a boot or crutches and moving toward full weight as pain allows. Background clinical guidance consistently favors early protected loading and progressive movement over prolonged casting, since a joint kept still too long loses conditioning it then has to rebuild from scratch.
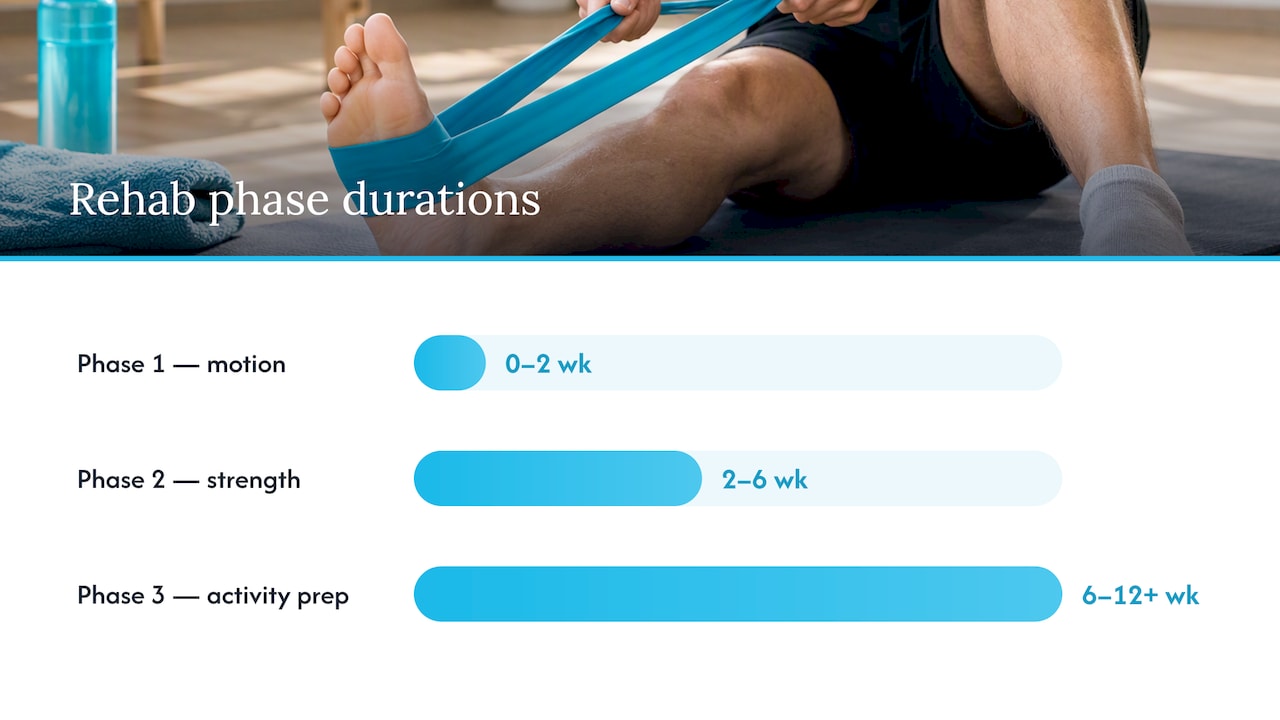
Phase 2: weeks 2 to 6, building strength and balance back up. This is where resistance bands come in, using them for controlled ankle inversion, eversion, and plantar flexion exercises to rebuild strength lost during the protective phase. Single-leg balance drills, first on solid ground and then on a foam pad or wobble board, retrain the proprioceptive feedback the ankle relies on to sense its position in space. Supports typically get weaned during this window: a rigid boot gives way to a lighter brace, and the brace itself sees less use as confidence and strength return. Detailed week-by-week benchmarks the clinic tracks for ligament recovery, including this stage, are laid out in this recovery milestone breakdown.
Phase 3: weeks 6 to 12 and beyond, preparing for full activity. Perturbation training, where a therapist or partner introduces unexpected shifts in balance, targets the proprioceptive deficits that persist after syndesmotic injury and that plain strength work alone does not fix. Agility drills such as lateral shuffles, figure-eight runs, and controlled cutting movements follow once the ankle tolerates single-leg loading without pain. Before returning to sport, most protocols call for hop testing and a side-by-side strength comparison, since a meaningful gap between the injured and uninjured leg is one of the clearest predictors of re-injury.
- Start each new phase only when the previous one’s pain and swelling have settled, not on a fixed calendar date.
- Track strength and hop distance on both legs separately so gaps show up early rather than at the return-to-sport test.
Pro Tip: If a resistance band exercise causes pain that lingers more than an hour afterward, drop the resistance level before adding more repetitions.
Because calf strength and conditioning often lag behind ankle-specific work, cross-training the lower leg matters too; this guide on calf strain treatment covers exercises that pair naturally with ankle rehab.
Braces, Boots, and Tape: Matching Support to Severity
The right support depends on how unstable the joint feels, not just how much it hurts.
- Elastic sleeves or soft supports suit mild sprains where swelling and instability are minimal, mainly offering compression and a sense of security during light activity.
- Semi-rigid braces or a stirrup-style support fit moderate injuries, limiting the side-to-side and rotational movements that stress a healing syndesmosis while still permitting supervised weight-bearing and rehab exercises.
- A walking boot protects more severe sprains during the first couple of weeks, taking pressure off the ligaments so early healing can start without a total halt to movement.
Most external supports get used for a few weeks rather than months, tapering off as strength and balance testing show the joint can handle less protection. Weaning too early, before the ankle passes basic strength and balance checks, raises the odds of re-injury; weaning too late lets muscles around the joint deconditioning set in unnecessarily. Athletic tape offers a cheap, flexible option during light activity but loses its supportive tension within hours of sweating or movement, making a brace the more reliable choice for anything beyond brief, low-intensity use.
When Surgery Enters the Picture
Most high ankle sprains never need an operation, but certain findings change that calculus.
- Radiographic evidence of diastasis, meaning the space between the tibia and fibula has visibly widened on imaging
- Gross mechanical instability found on clinical testing rather than pain alone
- An associated fracture, particularly a Maisonneuve fracture higher up the fibula, which typically requires fixation to restore normal leg mechanics
When surgery is indicated, two fixation approaches are most common: rigid cortical screws, which hold the bones in a fixed position while the ligament heals, and flexible suture-button devices, which allow slight natural motion between the bones. According to reporting from the American Academy of Orthopaedic Surgeons, some trials suggest suture-button fixation carries an outcome advantage in certain cases, including a lower rate of needing a second surgery to remove hardware, though screws remain a well-established option.
Post-surgical rehab follows a similar phased structure to conservative care but starts later and progresses more cautiously in the early weeks, since the fixation needs time to integrate before it takes full functional load. Surgical decisions hinge on radiographic and functional instability rather than pain severity, which is why the weight-bearing X-rays discussed earlier matter so much in the decision process.
Getting Back to Sport Without Setting Yourself Up for Round Two
Returning too early is the single biggest driver of repeat high ankle sprains, and the fix is testing rather than guessing.
- Strength symmetry. The injured ankle should match the uninjured side within a small margin on standard strength tests before contact or cutting sports resume.
- Full, pain-free range of motion. Any lingering stiffness at end-range dorsiflexion or rotation is a sign the joint is not ready for unpredictable loads.
- Passed functional testing. Single-leg hop distance, hop-and-stick landings, and sport-specific agility drills should all be completed without pain or compensatory movement.
- Ongoing proprioception work. Balance and perturbation training should continue well past the point symptoms disappear, since deficits in joint position sense are a major factor in repeat injuries.
- Bracing during high-risk return. A semi-rigid brace during the first several weeks back in sport adds a margin of safety while confidence and neuromuscular control catch up to pre-injury levels.
The average recovery period for syndesmotic sprains runs 8 to 12 weeks, noticeably longer than a typical lateral ankle sprain. That timeline shifts depending on severity, whether surgery was needed, and how consistently rehab milestones are hit rather than skipped. Athletes and active people managing long-term training loads around an injury like this may find broader planning resources, such as this guide on athletic career longevity, useful for pacing return to full training volume.
How The Tx Room Approaches High Ankle Sprain Recovery
At The Tx Room, high ankle sprain care combines the Fascial Distortion Model, a hands-on manual therapy approach, with the progressive loading and exercise prescription described above. FDM techniques target restrictions in the connective tissue surrounding the syndesmosis, which can otherwise limit range of motion even after swelling has settled. That manual work is paired with a structured exercise plan rather than used on its own, since mobility gained through hands-on treatment holds better when reinforced with active strengthening.
A typical short-term plan tracks the same milestones outlined earlier: pain-free range of motion, symmetric strength between legs, and successful functional testing before any return to sport or high-demand activity. Patients whose recovery has stalled under a standard approach, meaning stiffness, weakness, or instability persisting well past the expected timeline, are a common reason people seek out a second opinion and a different hands-on strategy.
What Most Rehab Advice Gets Wrong
Most online guidance on high ankle sprains front-loads rest and back-loads the interesting part: the strength and balance work that actually determines whether the ankle holds up under load again. Rest matters for the first several days, but the bigger risk is not moving too soon, it is stopping rehab the moment pain fades rather than continuing through proprioception and agility work. A joint can feel fine standing still and still fail the moment it has to react to an unexpected twist on a field or a curb.
The systematic-review evidence backs functional treatment over prolonged immobilization for good reason: ligaments and the muscles around them need graded stress to rebuild properly, not protection indefinitely. If there is one thing worth prioritizing above all else, it is finishing the balance and perturbation phase, not just the strength phase, before calling an ankle “recovered.” Strength alone does not catch someone on an uneven step. Proprioception does.
— Chris
Getting Hands-On Help for a High Ankle Sprain That Is not Improving
If a high ankle sprain has plateaued despite rest, a brace, and basic home exercises, hands-on treatment often moves things forward where a generic program stalls. Hands-on treatment options such as chiropractic care, soft tissue therapy, dry needling, and focused shockwave therapy are available as options for stubborn stiffness or lingering pain that has not responded to standard care.
A first appointment typically starts with an assessment of joint mobility, swelling, and movement patterns around the ankle, followed by a short-term plan combining manual therapy with the loading and balance exercises your recovery stage calls for. If your ankle has been slow to respond to rest and bracing alone, book a visit at The Tx Room to get a hands-on assessment and a plan built around where your recovery actually stands.
This article is general information, not a substitute for advice from a qualified doctor. Consult a qualified healthcare professional about your own circumstances before acting on anything here.
Sources
- Recovering From an Ankle Sprain | AAFP
- Rehabilitation of Syndesmotic (High) Ankle Sprains – PMC (NIH)
FAQ
What Is the Best Thing to Do for a High Ankle Sprain?
Protect the joint right away by avoiding forced outward rotation and deep upward bending of the foot, then start POLICE or RICE with ice, compression, and elevation. From there, a short protected period followed by early controlled motion and phased strengthening, as described in the rehabilitation review, gives the best outcome for most stable sprains.
Can I Walk on a Sprained Ankle?
Some weight-bearing is usually fine and even encouraged once pain allows, since prolonged immobilization tends to slow recovery compared to early functional movement. A boot or crutches for the first few days to a couple of weeks can help protect a more severe sprain while still permitting gentle, tolerated weight-bearing.
My Sprained Ankle Is not Getting Better. What Should I Do?
Pain, stiffness, or instability persisting well past the expected several-week window is a sign to get a clinical assessment rather than continue home care alone. A clinician can check for missed instability or fracture with weight-bearing X-rays and may recommend hands-on treatment or a revised rehab plan if progress has stalled.
How to Tell if It Is a High Ankle Sprain?
A high ankle sprain typically causes pain above the ankle joint itself, closer to the shin, rather than on the outer side of the foot where a common rolled ankle hurts. Pain that worsens with outward twisting of the foot or with pushing the ankle upward, along with difficulty bearing weight, points toward a syndesmotic injury and warrants a clinical exam to confirm.